Nautical-Inspired "Odds & Ends" Mason Jars ~ Diane's Vintage Zest!

Nautical-Inspired "Odds & Ends" Mason Jars


Remember back at the beginning of March, I mentioned that I would participate in the International Craft Swap?  Well, I never shared my finished project!

Basically, the rules stated that I would have to make the craft myself.  I could sew, crochet, knit, cross stitch, embroider, make jewelry, etc.  The second main rule is that it had to have a nautical theme.  I figured that I would sew a pincushion cuff or something cute.

Then, I found out I was paired up with Erin from Miss Crayola Creepy!  I already followed her blog after I found her on Map the Sewintists.  Also, I realized that I saw her from afar at Gertie's book event at Sew L.A. because she had blogged about it and I recognized her coat & dress right away.  Yay!

But then I knew there was no way I could sew anything for her!  I'd be way too intimidated.  So, I came up with these Nautical-Inspired Odds & Ends Jars.  :)


Nautical-Inspired Odds & Ends Mason Jars on Diane's Vintage Zest!


My first thoughts were that I should etch a couple of glass jars to hold different sewing odds & ends.  I definitely love my mason jars, as you know!  Still sewing-related, but I wouldn't have to have my work scrutinized by a pro!  So I ended up searching for images of nautical themed glass etchings.  Immediately, I saw lots of blue-tinted seaglass, which wasn't what I was looking for.  However, it gave me the idea to tint some jars!


Step #1: Make Rope Balls

But first up, I wanted to create a few rope balls to place in the jars.  I didn't want to send them empty!  I only needed rope and a styrofoam ball according to the tutorial.  Instead, I used a ball made out of foil, so I attacked these right away!


Nautical-Inspired Odds & Ends Mason Jars on Diane's Vintage Zest!


I ended up with three really cute balls (after having a bit of trouble with the first one).


Nautical-Inspired Odds & Ends Mason Jars on Diane's Vintage Zest!


Step 2: Tint Mason Jars

Next, I found this tutorial to tint jars.  Her favorite color was mint green, so I scrapped the blue jar idea.  I happened to have green food coloring on hand.  Perfect!  Here is my version of the jar tinting tutorial.  :)


What You Will Need
  • Baking sheet
  • Aluminum foil
  • Waxed paper or parchment paper
  • A disposable bowl
  • Measuring spoon
  • Spoon/stick for stirring
  • 1 teaspoon water
  • 2 teaspoons Mod Podge in gloss
  • Food coloring (5 - 10 drops, depending on how dark you want your jar)
  • 1 jar (pint-sized)


Nautical-Inspired Odds & Ends Mason Jars on Diane's Vintage Zest!
Jar Tinting "Ingredients"

Directions

1. Preheat oven to 200 degrees.

2. Line a cookie sheet with waxed paper or parchment paper on top of a sheet of aluminum foil. 

3. Mix the water, Mod Podge, and food coloring in a small bowl.
* Add more food coloring, if desired.  The jar will be substantially lighter than the mixture.


Nautical-Inspired Odds & Ends Mason Jars on Diane's Vintage Zest!
Steps 2 & 3.  I initially added only 4 drops and ended up with a very pale jar.

5. Pour mixture into the jar.

6. Carefully turn the on its side jar to evenly cover the entire inside.

7. Slowly pour the mixture back into the bowl while turning the jar, in order to coat the mouth of the jar.

8. Place the jar upside down on the cookie sheet and bake for three minutes.

9. Remove the cookie sheet from the oven.
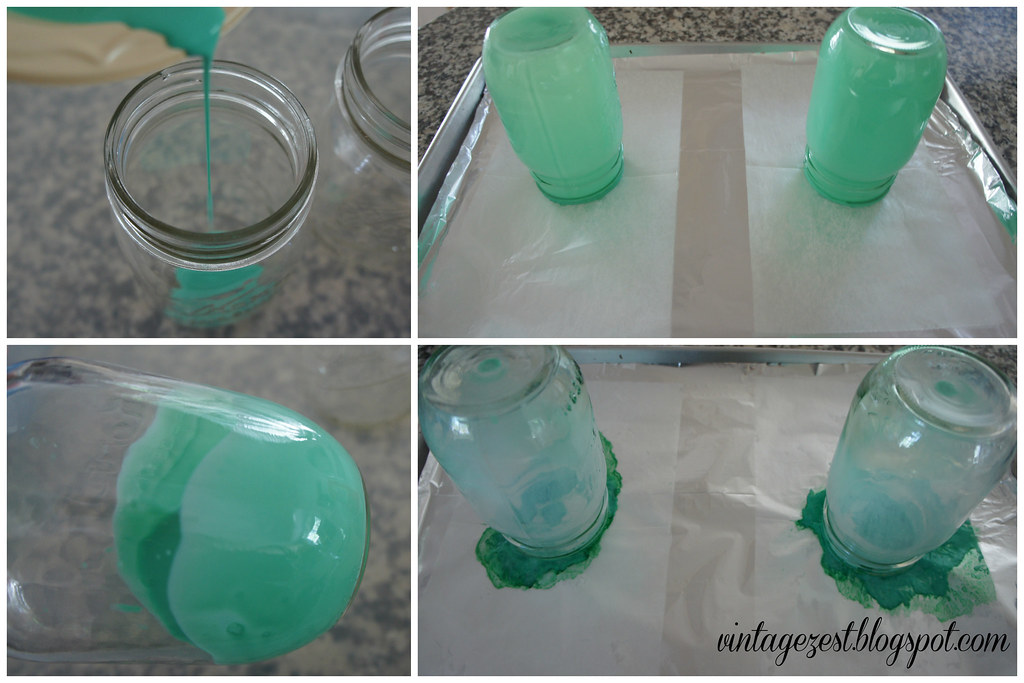

Nautical-Inspired Odds & Ends Mason Jars on Diane's Vintage Zest!
Steps 5 - 9


10. Carefully wipe the rim of the jar with a paper towel to remove the excess glue.

11. Turn the jar upright and bake until the color is clear.
* You may replace the waxed/parchment paper with a clean one if you like.

12. If the jar is too pale, you can repeat the process once the jar has cooled.
* I repeated the process, so I ended up with the darker green in my final project pictures.  My first attempt resulted in the very pale green just above.  Next time, I'll just add more food coloring!

Note: If the jar is streaky or you want to remove the color completely, fill the jar with hot water and a few drops of dish soap.  It may need to sit overnight.  The next day, refill with more hot water and soap before completely scrubbing out.


Step 3: Make Rope Netting

I found a tutorial here to make a fish net covering for the jar.  No suggestions for improvements, it's perfect as is!  All I needed was a spool of rope and some time to figure it out.  :)


Nautical-Inspired Odds & Ends Mason Jars on Diane's Vintage Zest!


I wanted to leave an area for my "Odds & Ends" labels, so I had to play around with making a deliberate hole in the net.
My first attempt ended up too low on the jar, so I had to cut it off and try again.  Perfection the second time!


Step 4: Apply Vinyl Labels!

Instead of etching the glass directly, I decided to make vinyl labels with my Silhouette.  Initially, I wanted to use the words "Odds & Ends," "Bits & Baubles," "Buttons & Scraps," or something similar.  Then, I remembered the nautical theme and thought of the words "Flotsam & Jetsam."  Perfect!

After looking at the top of the jar, I realized that I should cover up those boring tops!


Nautical-Inspired Odds & Ends Mason Jars on Diane's Vintage Zest!


The tops of the jars are EASILY my favorite part of the whole project.  I wouldn't mind if Erin cut the net off, removed the labels, chucked the balls, and un-dyed the jars.  I actually designed all of the elements to be removable.  But, it would be a shame to remove these cute little tops!

By the way, I included a bonus vinyl seahorse with the package.  Yay!


Nautical-Inspired Odds & Ends Mason Jars on Diane's Vintage Zest!


Next week, I'll share what she gifted to me!


Nautical-Inspired Odds & Ends Mason Jars on Diane's Vintage Zest!


22 comments:

  1. I can't believe how cute this is. You are so crafty. Those little rope balls might be my favorite. I can think of so many places they would be cute in my house!


    Thanks for linking up to Raising Imperfection.
    Tiffany
    www.littlegems3.blogspot.com

    ReplyDelete
  2. Amazing project!I love nautical things!

    http://freestilcreatingbyvilly.blogspot.gr/

    ReplyDelete
  3. Очень интересно! Замечательная идея! Спасибо Вам!

    ReplyDelete
  4. Would love for you to share this at my link party where we pin all those who join to our party board

    http://myfashionforwardblog.com/all-things-pretty-11/

    ReplyDelete
  5. So cute. Found this over at Weekend Re treat and Pinning it.

    ReplyDelete
  6. What a lovely gift idea. I would never have thought of food coloring and mod podge. Your tutorial was excellent.
    Hugs,
    Bev

    ReplyDelete
  7. Thanks! I'm never quite sure if I'm making sense only in my head. :) Have fun making your own!

    ReplyDelete
  8. Your tutorial was great! Very clear and LOVE all the pics! I'm a bit mason jar obsessed so this project is right up my alley! Thanks for linking up at the Summer Bucket List Party =) Marcy @ day2day SuperMom

    ReplyDelete
  9. I am obsessed with all things rope and twine and am wanting to do something like this to an old vase I have. Thank you so much for the tutorial!
    ~Katie

    ReplyDelete
  10. I love these! I never thought to use food coloring to color mod podge. What a great idea! Pinned.

    Stopping by from Tasty Thursday. Have a wonderful weekend!

    Julie @ This Gal Cooks

    ReplyDelete
  11. Thanks! And you're welcome for the feature. :)

    ReplyDelete
  12. Love the Flotsam & Jetsam labels! What a fun idea!
    And thanks for much for featuring my blackberry cobbler at Sugar Bee Crafts today!!

    ReplyDelete
  13. What a great gift idea! So cute! Thank you for spreading JOY and sharing at the Oh What a HAPPY Day party.

    ReplyDelete
  14. Hello,

    Giardino degli Ulivi Resort is organizing italian cooking classes for at least 10-15 members groups that want to spend a very nice and relaxing vacation in the south of Italy.

    We are offering special discounts for cooking classes plus accomodation and guided visits to foodmarkets and oil, wheat, pasta and mozzarella production companies.

    You will discover the wonderful Italian cuisine by cooking typical apulian and italian dishes.

    You will learn to cook orecchiette, handmade pasta, focaccia and many other delicious apulian dishes.

    But we are very interested to host YOUR cooking class too. You only have to make the best choice for your needs.

    Your associates could join a fantastic and very useful culinary journey in the wonderful south of Italy. Please visit us at:

    giardinodegliulivi.blogspot.it

    Giardino degli Ulivi

    For further informations:

    Web site: www.giardinoulivi.com

    e-mail: giardinodegliulivi@tiscali.it

    tel.: +39 0883630022

    +39 3337489777

    ReplyDelete
  15. I love my gifts sooo much!! Thank you!!! xoxo

    ReplyDelete
  16. Cute Project! I love your nautical themed mason jars. Thanks for sharing the tutorial on how to tint mason jars, I was wondering how to tackle that project. I am pinning your post to use later. Have a Fabulous Day!

    ReplyDelete
  17. I love the rope and knotted thingees. Thanks for sharing.

    ReplyDelete
  18. I have seen these before and thought they were very neat ... What a great craft, and fairly simple!

    Thank you for linking to Raising Imperfection.
    Please come back Friday to see if you were featured. :)

    *´¨)
    ¸.•*´
    (¸¤ Lanaya | xoxo
    www.raising-reagan.com

    ReplyDelete
  19. I love these so much. They are absolutely adorable. I think my favorite are the labels flotsam and jetsam. :)

    Thank you for linking up to Raising Imperfection!
    Make sure to check back on Friday to see if you were featured.
    Leslie
    www.violetimperfection.com

    ReplyDelete
  20. My first post on your blog and really it is just to say thanks for your Nice Post And Shairing

    You always pick such interesting i visit your blog regularly for updates!

    Loved your description of it.

    Thank you for picking this one.

    http://mp4mobilevidios.blogspot.com/

    ReplyDelete
  21. What a wonderful project Diane, perfect for coastal decor! They so remind me of those glass ball fishnet floats from Japan, and filled with sailor knots...perfect! At first glance I thought these were made from the new Ball Heritage green jars, silly me you painted them! I adore the creative names too... you should totally share this one at Coastal Charm!

    ReplyDelete
  22. I did this a year ago before the green jars were even available! :)

    ReplyDelete

I love to hear your comments! And putting in your two cents is always free. :)

.